


Today, we’re going to talk about a fall-winter nail trend that will continue to be popular for a long time: nail stamping.
What is it? Nail stamping? A very popular technique today that allows you to duplicate a particular decoration or nail art by literally imprinting it on the nails using a stamp made of various materials, including silicone, the most common.
Thanks to this invention, even the most inexperienced nail artist will achieve a precise and highly original manicure without much effort; you won’t need any particular creative talent or a steady hand. However, today we’re going to list 5 mistakes that could compromise the success of your nail art if you’re new to professional nail stamping.
1. Did you remove the film from the plate while stamping?
All nail stamping plates. When new, they are covered with a thin film that protects their beautiful patterns and designs. Although it may often seem invisible, know that it’s still there and you’ll need to remove it to create your amazing decorations.
2. Do not use solvents to clean the mold
Many stamping enthusiasts and beginners are unsure how to use silicone stampers when it comes to cleaning them. We recommend that you absolutely avoid using any solvents, even the super delicate ones without acetone. The surfaces should be cleaned using simple adhesive tape or a professional adhesive brush. Thoroughly cleaning the surfaces will ensure a more precise final result, especially for decorations that will cover the entire surface of your nail.
3. Use too much or too little color
To achieve professional nail stamping results, in addition to using the best manicure supplies, you’ll need to fine-tune the amount of color to use: never too much and never too little. There are different philosophies in beauty salons. With stamping nail polish, to allow it to air dry, we recommend covering the decoration at least three-quarters of the way, then scraping off the excess. This way, the polish will spread more evenly, making it easier to remove quickly and without smudging, before it dries.
4. Not knowing the right technique
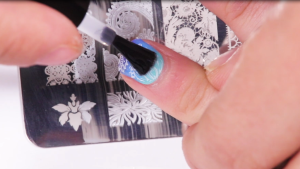
There are also different schools of thought regarding the correct motion to use to remove the design. After applying the required amount of nail polish directly onto your design, remove the excess color with the palette knife, then “collect the image” with the light, using a rotating motion without applying too much pressure. You’ll need to quickly press the stencil onto the design, keeping it perpendicular. In any case, you should not move left and right several times, as this could smudge the design. The same applies when stamping nails on the nail surface: hold the stamper perpendicularly.
5. Making Mistakes in Designing and Choosing a Top Coat
For those who are just starting out with nail stamping and don’t know how to use it, another problem is incorrectly timing the top coat application. Remember that the decoration must be completely dry before applying the top coat, otherwise the design will lose its clarity and ruin your work. We remind you that not all top coats are suitable for stamping. The product you choose should not be too runny. To display it, the same method as all yours is used for nail art manicure: no more sliding the brush over the design; it’s better to place a generous drop in the center of the nail and spread it evenly and quickly, working the product in so as not to press too hard on the stamping design for professional nails.
In this section of our nail supply store, you’ll find a wide selection of manicure tools, so you can quickly achieve beautiful and perfect designs! By choosing the colors and decorations of your choice, you’ll achieve trendy nails with super personalized stamping!
Read also: Shine On: Your Guide to Semi-Permanent Nail Polish